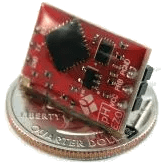
EZO sensor circuits
The ezo sensor platform allows you to use your EZO sensor circuits with
ESPHome. The I²C Bus is
required to be set up in your configuration for this sensor to work.
All embedded solutions from EZO can be found here.
If a certain command is not supported directly, it can be executed with the send_custom() method call.

# Example configuration entry
sensor:

  - platform: ezo
    id: ph_ezo
    address: 99
    unit_of_measurement: "pH"
    update_interval: 10s

  - platform: ezo
    id: rtd_ezo
    name: "RTD Temperature"
    address: 102
    accuracy_decimals: 2
    unit_of_measurement: "°C"
    update_interval: 10s
Configuration variables:
- address (Required, int): Specify the I²C address of the sensor.
- update_interval (Optional, Time): The interval to check the
sensor. Defaults to
60s. - All other options from Sensor.
Automation triggers:
- on_led (Optional, Action): Triggered when the result of
get_led_state()is ready. The LED state is provided as a boolean variable namedx. - on_device_information (Optional, Action): Triggered when the result of
get_device_information()is ready. The result is provided as astd::stringvariable namedx. - on_slope (Optional, Action): Triggered when the result of
get_slope()is ready. The result is provided as astd::stringvariable namedx. - on_calibration (Optional, Action): Triggered when the result of
get_calibration()is ready. The result is provided as astd::stringvariable namedx. - on_t (Optional, Action): Triggered when the result of
get_t()is ready. The result is provided as astd::stringvariable namedx. - on_custom (Optional, Action): Triggered when the result of
get_custom()is ready. The result is provided as astd::stringvariable namedx.
Lambda calls
From lambdas, you can interact with the sensor in various ways. For any get command a trigger will be called
with the information retrieved from the sensor. For more information on the command specifics, refer to the datasheet.
set_i2c(uint8_t address): Set I2C address of the device, must be an integer between 1 and 127id(ph_ezo).set_i2c(100);get_device_information(): Sensor retrieves calibration and triggerson_device_information:once doneid(ph_ezo).get_device_information();set_sleep(): Put the device to sleepid(ph_ezo).set_sleep();get_state(): Performs a read on the current sensor.id(ph_ezo).get_state();get_slope(): Sensor retrieves slope and triggerson_slope:once doneid(ph_ezo).get_slope();get_t(): Sensor retrieves temperature compensation value (in Celcius) and triggerson_t:once doneid(ph_ezo).get_t();set_t(float value): Send the given temperature (in Celcius) to the sensor.id(ph_ezo).set_t("27.00");set_tempcomp_value(float temp): Send the given temperature (in Celcius) to the sensor (this is an alias ofset_t()for backwards compatibility)id(ph_ezo).set_tempcomp_value(id(rtd_ezo).state);get_calibration(): Sensor retrieves calibration and triggerson_calibration:once doneid(ph_ezo).get_calibration();set_calibration_generic(float value): Sets the calibration with no point.id(ph_ezo).set_calibration_generic(750.0);set_calibration_point_low(float value): Sets the low calibration point.id(ph_ezo).set_calibration_point_low(4.00);set_calibration_point_mid(float value): Sets the medium calibration point.id(ph_ezo).set_calibration_point_mid(7.00);set_calibration_point_high(float value): Sets the high calibration point.id(ph_ezo).set_calibration_point_high(10.00);clear_calibration(): Clears all calibration points.id(ph_ezo).clear_calibration();get_led_state(): Sensor LED state and triggerson_led:once doneid(ph_ezo).get_led_state();set_led_state(bool on): Sensor LED on or offid(ph_ezo).set_led_state(true);send_custom(const std::string &payload, uint16_t delay_ms = 300, bool response_expected = false): Runs a custom command. This sends exactly what is inpayload. Optionally you can set adelayand if a response is expected that should be parsed. Defaults tofalsefor custom commands. Triggerson_custom:if there’s a response.// Run a custom command to turn on the LED id(ph_ezo).send_custom("L,1");


